Activating a Passkey
Instructions
You can activate and store your passkeys on cloud-enabled mobile devices (Apple iPhone, Android) or on dedicated physical security keys (FIDO2-certified, like YubiKey, Google Titan, Token2, etc.) or through Windows Hello.
Cloud-enabled Mobile Devices:
-
Apple iPhone (via iOS Passwords)
-
Android smartphone (via Google Password Manager, Samsung Pass, etc.)
Physical Security Keys - FIDO2 compatible:
A few well-known options on the market include:
-
YubiKey
-
Google Titan
-
Token2
-
Other FIDO2-certified hardware keys
Cloud-synced Password Managers with Passkey Support:
-
1Password
-
Proton Pass
Windows Hello
-
Windows machine supporting Windows Hello.
Notes:
-
You can activate up to 3 Passkeys for the same user.
-
For detailed requirements, please see the System Requirements page.
-
Unlike the other passkey types, Windows Hello passkeys are only stored locally on the machine and cannot be used to log in from other devices (e.g., a different computer, phone, or tablet). For this reason, along with the Windows Hello passkey, we strongly recommend you to activate one or more passkey of a different type (e.g: cloud-enabled mobile passkey, physical security key, cloud-synced password manager passkey) to ensure you can still access your account from other devices.
-
For the activation of all non-physical Passkeys (except same device activation), the Bluetooth must be enabled on both the device where you perform the activation (e.g. laptop/desktop PC) and the device where your passkey will reside (e.g. your mobile phone).
-
For the Bluetooth activation, please refer to the instructions below, according to the operating systems of your devices.
 How to Enable Bluetooth on iOS
-
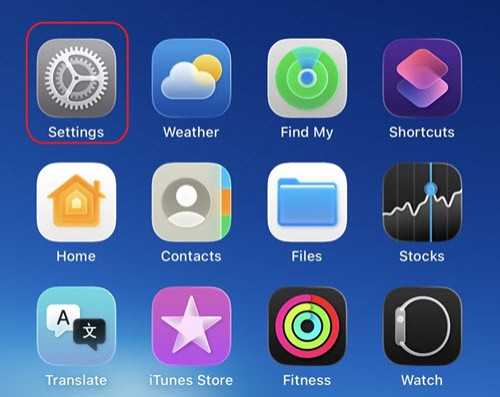
Locate the Settings App
From your Home Screen, find and tap the Settings icon (grey icon with gears).
-
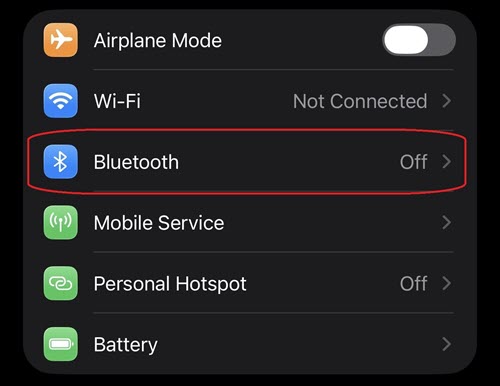
Navigate to the Bluetooth menu
Scroll down slightly and tap "Bluetooth" from the list of options (it appears near the top, below Airplane Mode and Wi-Fi).
-
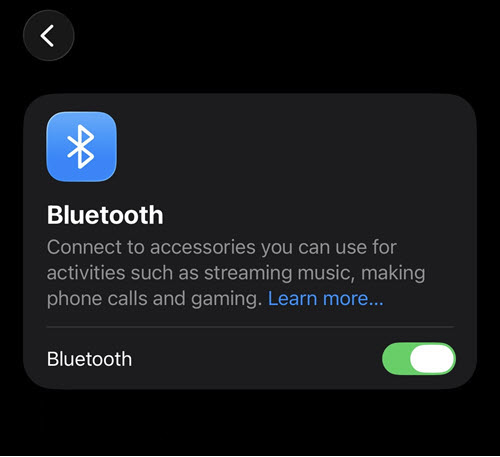
Enable Bluetooth
Tap the toggle switch next to Bluetooth to turn it ON.
-
The toggle will turn green
 to confirm Bluetooth is now enabled.
-
Important: Ensure Bluetooth remains enabled throughout the passkey activation process. Once turned on, you may proceed to the next steps to activate your passkey.
How to Enable Bluetooth on MacOS
-
Open System Settings
Click the Apple Menu at the top left of your screen, then click "System Settings".

-
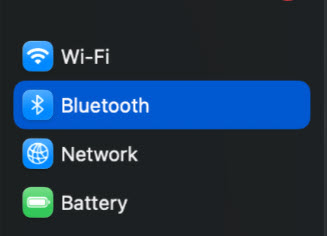
Navigate to Bluetooth
In the System Settings window, click on "Bluetooth" from the left-hand menu.
-
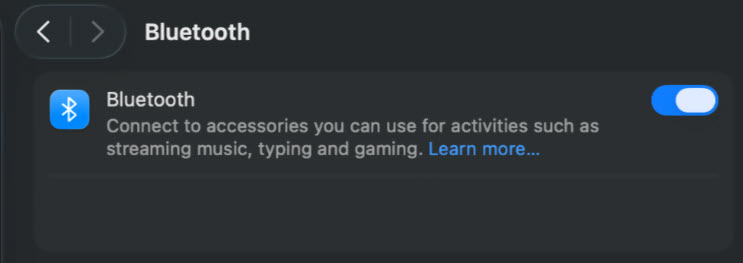
Enable Bluetooth
Click the toggle switch next to Bluetooth to turn it ON.
The toggle will turn blue to confirm Bluetooth is now enabled.
Important: Ensure Bluetooth remains enabled throughout the passkey activation process. Once turned on, you may proceed to the next steps to activate your passkey.
How to Enable Bluetooth on Windows PC
Option 1 - Through the Settings Menu
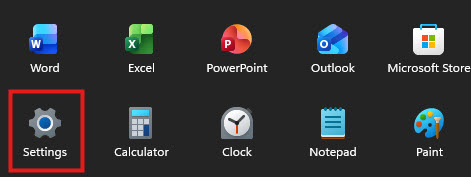
Click the Start Menu at the bottom left of your screen, then click the Settings icon.
-
Open Settings
On the Windows device, click on Start
 and then select Settings
  .
.
-
Navigate to Bluetooth & Devices
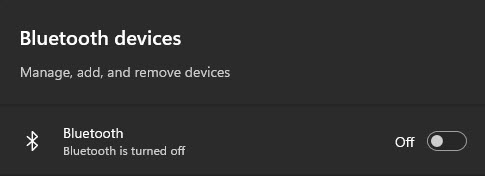
In the Settings window, search for "Bluetooth devices".
-
Enable Bluetooth
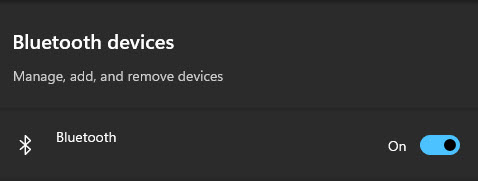
Click the toggle switch next to Bluetooth to turn it ON.
The toggle will turn blue to confirm Bluetooth is now enabled.
OR:
Option 2 - Through the Quick Settings
-
Step 1: Open Quick Settings
Click the Quick Settings icon at the bottom right of your taskbar (look for the WiFi, sound, or battery icons).
-
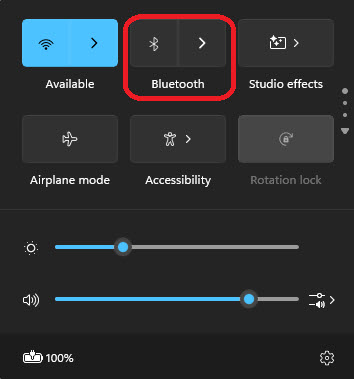
Step 2: Locate Bluetooth
In the Quick Settings panel, find the Bluetooth button.
-
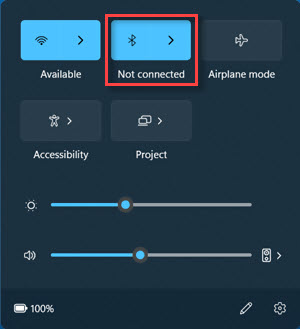
Step 3: Enable Bluetooth
Click the Bluetooth button to turn it ON.
Important: Ensure Bluetooth remains enabled throughout the passkey activation process. Once turned on, you may proceed to the next steps to activate your passkey.
How to Enable Bluetooth on Android OS
-
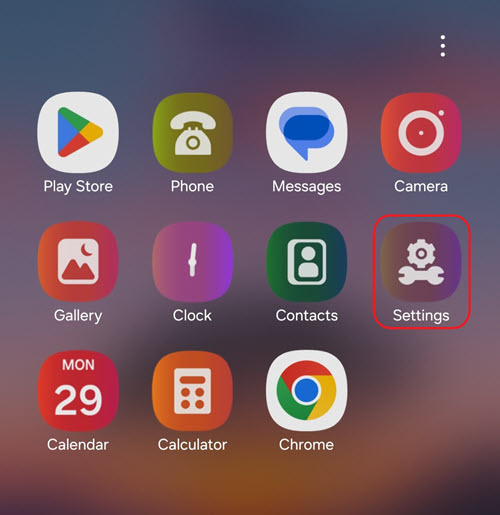
Step 1: Open Settings
Locate and tap the Settings icon (⚙️) on your Home Screen or App Drawer.
-
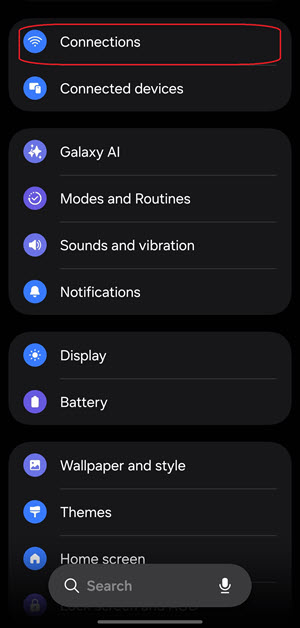
Step 2: Navigate to Bluetooth
In the Settings menu, tap on "Connections" then tap "Bluetooth".
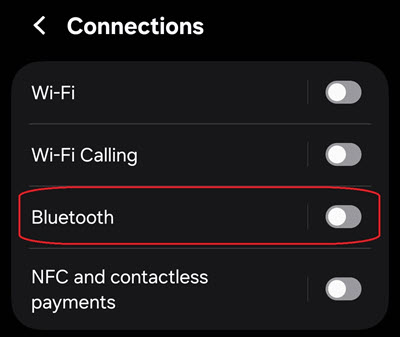
-
Step 3: Enable Bluetooth
Tap the toggle switch next to Bluetooth to turn it ON.
-
The toggle will turn blue to confirm Bluetooth is now enabled.
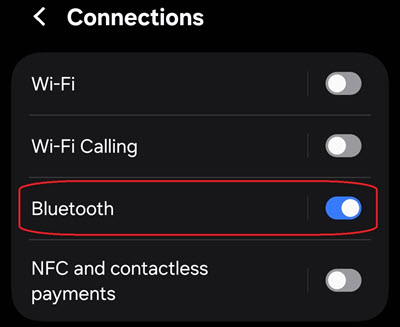
-
Note: Different models and manufacturers may have slightly different settings and menu layouts. If your screen looks different, please search for "Bluetooth" in your device's Settings search bar to locate the relevant setting.
How to Activate a Passkey
You can register a passkey using either one of the following methods:
-
Login Task: during your login, IBKR may prompt you to complete a passkey activation task.
-
Client Portal Settings: at any time, you can manually register a passkey through the Secure Login System (SLS) page in your account Settings.
Activation via Login Task
-
Log in to your IBKR account using your existing credentials and 2FA method.
-
After successful login, you will see a task prompting you to activate a passkey.
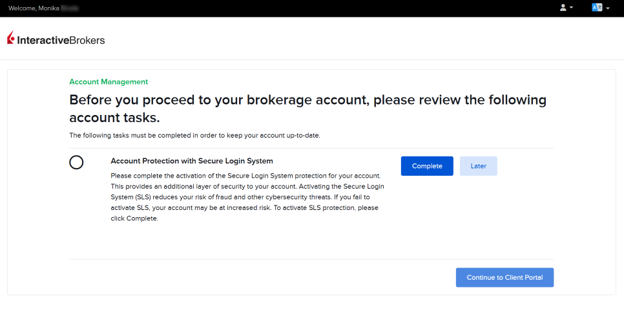
-
Click on "Complete" on the prompt.
-
You will be redirected to the passkey registration widget.
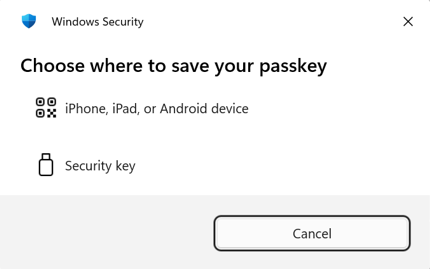
-
Choose where to store your passkey (Mobile device or Physical security key) and follow the corresponding instructions below.
-
Once the registration is completed, click on "Continue to Client Portal".
Note: If you dismiss the login task, you can still activate a passkey later, from the Client Portal Settings.
Activation via Client Portal Settings
-
Log into Client Portal.
-
Click on the User ("Head and Shoulders” icon in the top right corner) Settings → Security → Secure Login System (SLS).
-
The 2FA registration widget will appear on the right side.
-
Select the "Passkey" tab.
-
Choose where to store your passkey (Mobile device or Physical security key) and follow the corresponding instructions below.
How to activate and save a Passkey on your Mobile device (QR Code or Bluetooth method)
-
In the 2FA registration widget, click on the "Passkey" tab.
-
Give your passkey a descriptive name in the "Name your device" section and click on "Register".
.png "Register Passkey for Windows")
-
Select the option "iPhone, iPad or Android Device" to activate the Passkey on your preferred device (avoid using devices that will not be readily available to you, such as tablets).
.png "Choose Where to Save Passkey for Windows")
-
On your mobile device (iPhone or Android), open your Camera app and point the camera at the QR code displayed on your computer screen (make sure Bluetooth is enabled on your device).
.png "Passkey QR Code for Windows")
-
Once your device is connected, tap on "Register/Create Passkey" (note: the appearance and/or the text of this pop-up screen may be slightly different, according to your mobile device).
.jpeg "Create Passkey for Windows")
-
You will be prompted to verify your identity using Face ID, Touch ID, fingerprint, or your device PIN. Complete the verification.
-
After successful verification, a "Successful Registration" confirmation will appear on the web page.
-
Your software passkey is now registered and ready to use as a 2FA method.
How to activate and save a Passkey on your Mobile device (Same Device)
Use this method when you are logging in and registering the passkey directly on the same device you are using to access your IBKR account on Portal. Since the Passkey is being created and stored on the same device, Bluetooth and QR code scanning are not required.
-
Log into Portal using your mobile browser.
-
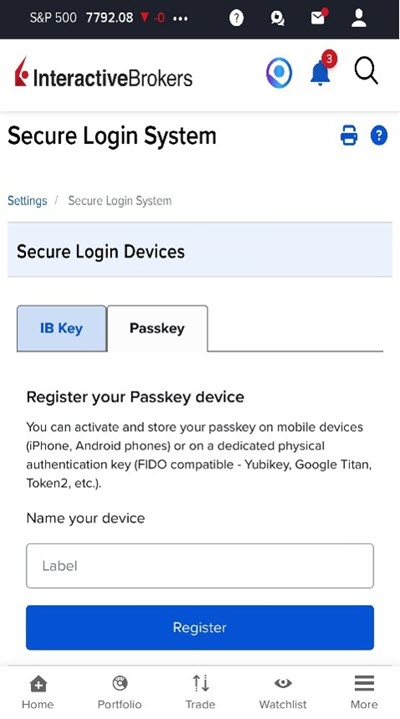
In the 2FA registration widget, tap on the Passkey tab.
-
Give your passkey a descriptive name in the Name your device section and tap on Register.
-
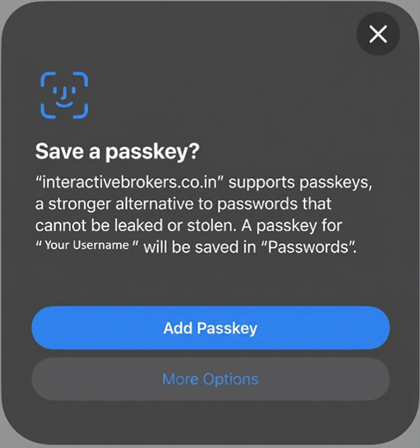
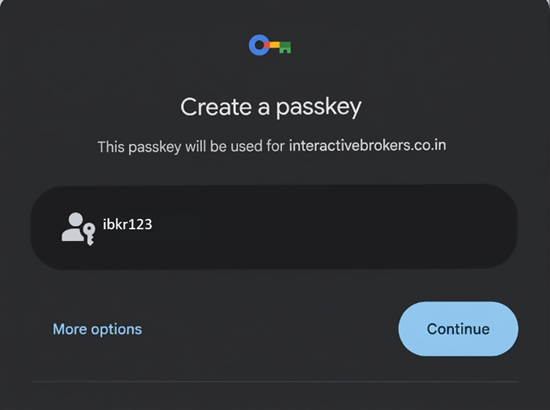
A dialogue box will pop up. Tap on Add Passkey if using an iPhone, or Continue if using an Android Phone.
-
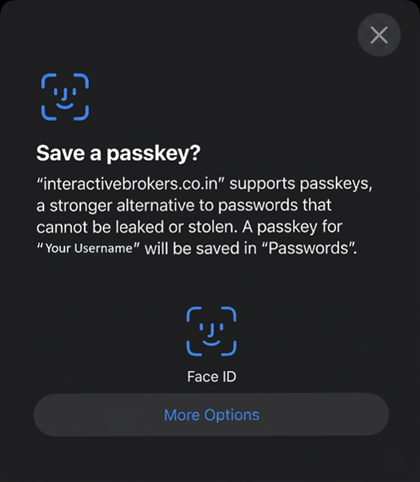
You will be prompted to verify your identity using Face ID, Touch ID, fingerprint, or your device PIN to complete the verification.
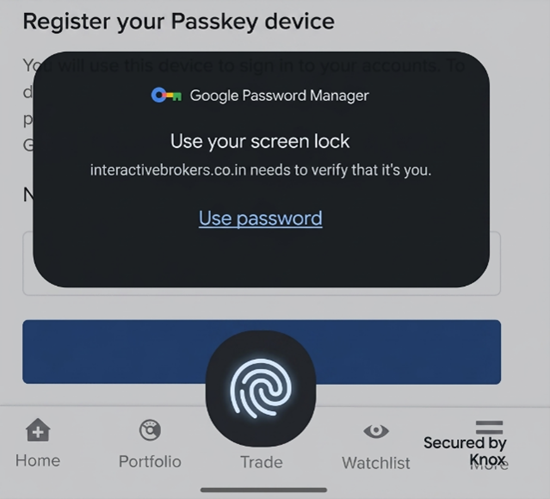
-
After successful verification, a Successful Registration confirmation will appear on the screen.
-
Your passkey is now registered and ready to use as a 2FA method on your device.
How to activate and save a Passkey on your Physical Security Key
-
In the 2FA registration widget (see section Passkey Menu above), click on the "Passkey" tab.
-
Give your passkey a descriptive name in the "Name your device" section and click on "Register".
-
Select "Security Key".
.png "Select Security Key for Windows")
-
Insert your physical security key into your device's USB port (or hold it near your device for NFC-enabled keys) and enter your PIN when asked.
-
If you have never used this passkey for other services, you may be requested to set a PIN code for your passkey.
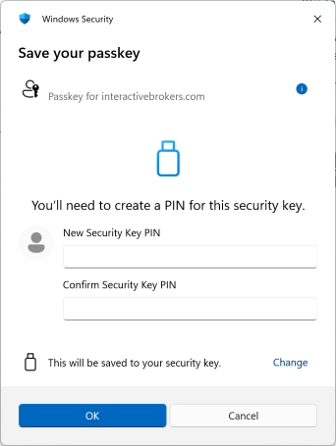
Note: Please refer to your security key vendor's documentation for guidance on setting up a PIN).
-
If you already have a PIN setup, please enter your PIN when asked.
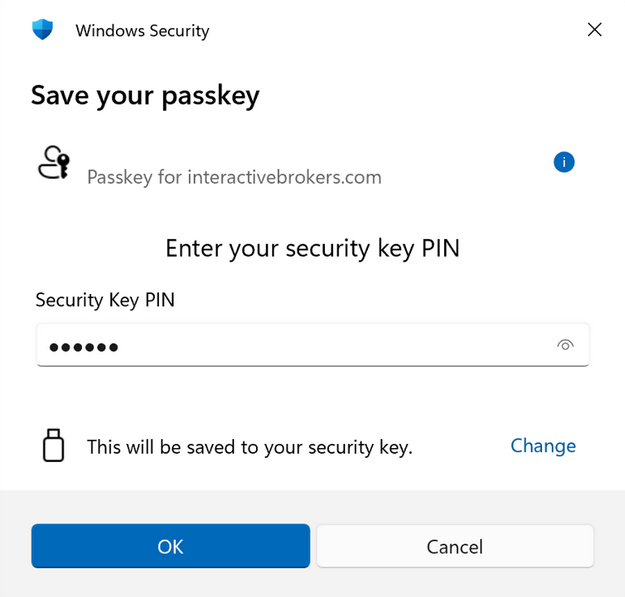
-
Touch the button or sensor on your security key.
-
Wait for the "Registration Successful" confirmation message.
-
Your hardware security key is now registered and ready to use as a 2FA method.
How to activate and save a Passkey on Windows Hello
-
On your Windows PC, access the passkey registration widget (either via Login Task or Client Portal Settings).
-
In the 2FA registration widget, click on the "Passkey" tab.
-
Depending on your browser configuration, one of the following will occur:
-
You are directly prompted with "This will be saved to your windows device", indicating the passkey will be saved to your Windows device.
→ Click "Save" or "Continue" to proceed with Windows Hello registration.
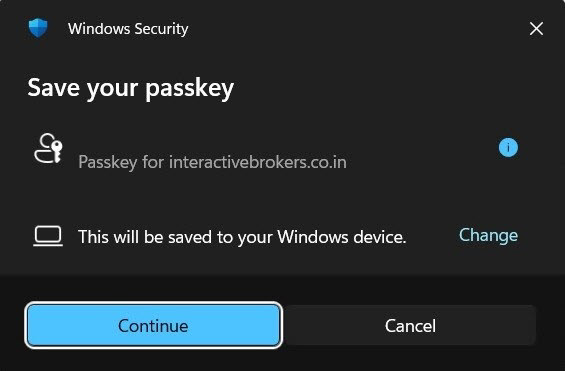
-
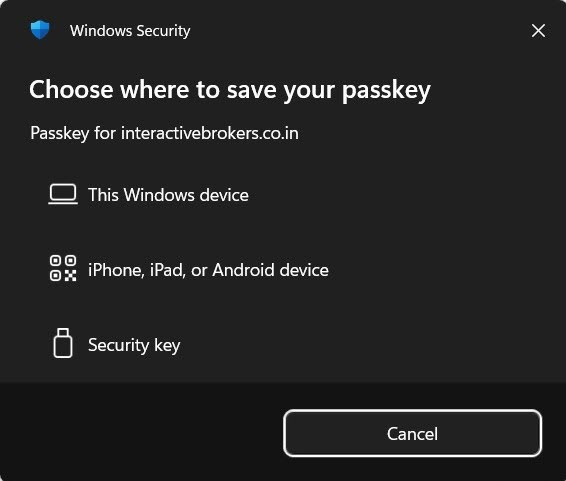
You are shown multiple device options (e.g., "This Windows device," "iPhone, iPad, or Android device," "Security key"), either directly or after having clicked or "Change" or "Other options."
→ select "This device" or "Windows device" to proceed with Windows Hello registration.
-
-
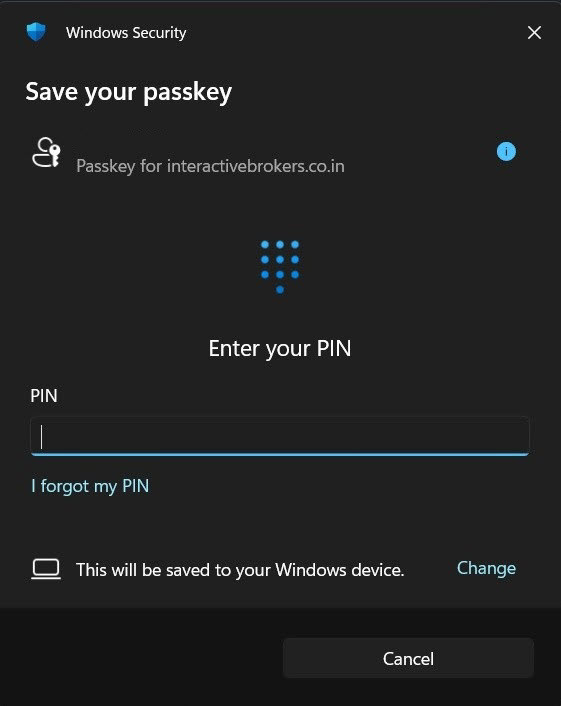
Follow the Windows Hello prompt to authenticate using facial recognition, fingerprint, or your Windows PIN.
-
Wait for the "Registration Successful" confirmation message.
-
Your Windows Hello passkey is now registered and ready to use as a 2FA method.
Best Practices
Best Practices
Enable biometric protection for your mobile passkeys
Your passkeys are automatically protected by your device's security features (Face ID, Touch ID, fingerprint, PIN, or pattern). We strongly recommend:
-
Keep your device lock screen enabled at all times.
-
Use strong biometric authentication (Face ID, fingerprint) rather than simple PINs when possible.
-
Enable automatic device lock after a short period of inactivity.
-
Never share your device PIN or biometric data with anyone.
Use cloud-synced passkeys for convenience
Several passkey providers offer cloud synchronization, which automatically makes your passkey available across multiple devices (non-exhaustive, suggestion list):
-
iCloud Keychain (for Apple devices): Syncs passkeys across all your Apple devices signed in with the same Apple ID.
-
Google Password Manager or Samsung Pass (for Android/Chrome): Syncs passkeys across all devices signed in with your Google or Samsung Account.
-
1Password, Bitwarden, NordPass, Proton Pass: Sync passkeys across all platforms where you use these password managers.
This eliminates the need to register separate passkeys for each device and provides automatic backup.
FAQs
-
How to manage the existing Passkeys or activate additional ones?
-
Can I activate a passkey without installing a third-party app or buying a security key?
-
When I try to register a passkey, nothing happens or I don't see the prompt.
-
When I try to scan the QR code, the camera does not activate.
-
My hardware security key isn't being recognized during registration.
-
I'm getting a "Registration Failed" error when trying to activate my passkey.
-
The passkey registration seems to complete but I don't see a confirmation message.
-
I activated a new passkey and now I want to remove my old one, but I'm not sure which is which.